Claimants
Claim an expense
Set up your payment details, add receipts, and follow your report through approval and payment.
Before you start
Have your receipts and New Zealand bank account details ready. Claims are in NZD. You can claim part of a receipt, and you can use the same receipt on more than one expense line.
Open reimbursements. Sign in if asked. The first time you visit, you must complete your payment settings before viewing reports or approvals. Opening reimbursements also adds it to your members menu.
Older links using ?launcher=reimbursement also open the members reimbursement page.
Each expense report has its own address, which you can bookmark or share with someone who already has permission to view it.
Choose Help at the end of the members navigation to open the help guides.
Set up your payment details
Enter the account holder and bank account number for reimbursements. To change these later, open Payment settings. The details used for a submitted report are kept with that submission, so changing your settings later does not change its payout account.
Create your report
- On My reports, choose Create (the plus button) beside Active reports.
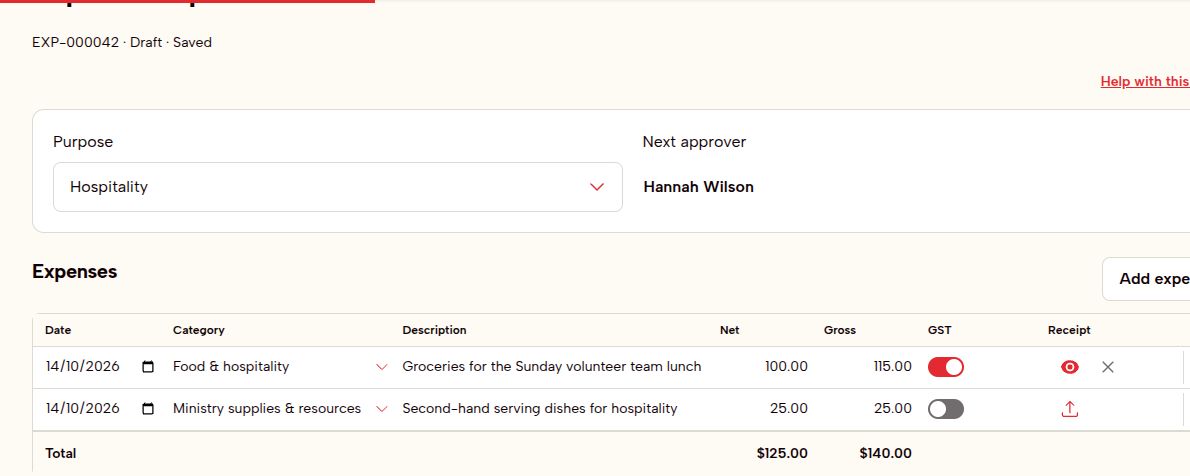
- Select a Purpose. Each report has one purpose; only purposes with an assigned approver are available.
- Check Next approver to see who will review it.
- Add an expense for each item or category you are claiming.
Add expenses and receipts
For each line, enter a date, category, description, and amount. You can enter Net or Gross; the other amount is calculated for you. Leave the GST switch on when the expense includes GST, or turn it off when it has no GST.
Attach one receipt file to every line using Upload receipt on mobile, or the upload icon on a computer. You can use a camera photo, a JPEG, PNG or WebP image, or an unlocked PDF. On a computer, you can also drag a receipt onto the expense row.
Each file can be up to 10 MB. Images must be still images of 40 megapixels or less; each PDF can have up to 20 pages. Together, a report's receipts can be up to 15 MB and 50 pages. A shared receipt counts once, even when attached to several lines. The complete report PDF, including its summary and activity, must fit within 15 MB and 80 pages for email. If a file cannot be read, export a fresh image or unlocked PDF. If your report exceeds a limit, compress the receipts or split the expenses into separate reports before submitting.
Show receipt opens an attached receipt on mobile; on a computer, use the eye icon. The trash icon beside Show receipt removes the attachment on mobile; on a computer, use the X. You can then upload a replacement. On mobile, open the three-dot menu on an expense card and choose Delete expense to remove the entire line. On a computer, use the trash icon. Use Add expense to add another line.
Save or submit
Your work saves automatically, even while a line is incomplete. Save also saves your current changes. You can return to an unfinished draft from My reports.
Choose Submit when everything is ready. You must complete the required fields and attach a receipt to every line before submitting.
Follow your report
My reports shows its current state:
- Draft: still being prepared.
- Awaiting purpose approval: waiting for the purpose approver.
- Awaiting finance approval: purpose approval is complete; finance is reviewing it.
- Rejected: changes are needed. The reason appears at the top when you open the report.
- Awaiting payment: approved and waiting for finance to pay it.
- Paid: finance has confirmed payment. Find it under Show older.
Make changes after submitting
While your report is awaiting approval, choose Edit and confirm that you want to return it to draft. This disregards current approvals. When you submit it again, the approval process starts from the beginning.
If your report is rejected, open it, read the reason at the top, make your changes, and submit again. It returns to purpose approval before finance reviews it.
Once finance approves the report, you cannot edit it. Contact us if you need help with an approved or paid report.
Stop an unfinished claim
In My reports, use the three-dot menu on a mobile report card and choose Archive report. On a computer, use the archive icon. You can archive drafts, rejected reports, or reports awaiting approval. Confirming stops the reimbursement process and moves it under Show older. You can restore an archived report as a draft using the restore-arrow icon on a computer, or Restore as draft in its mobile menu, and submit it again later.